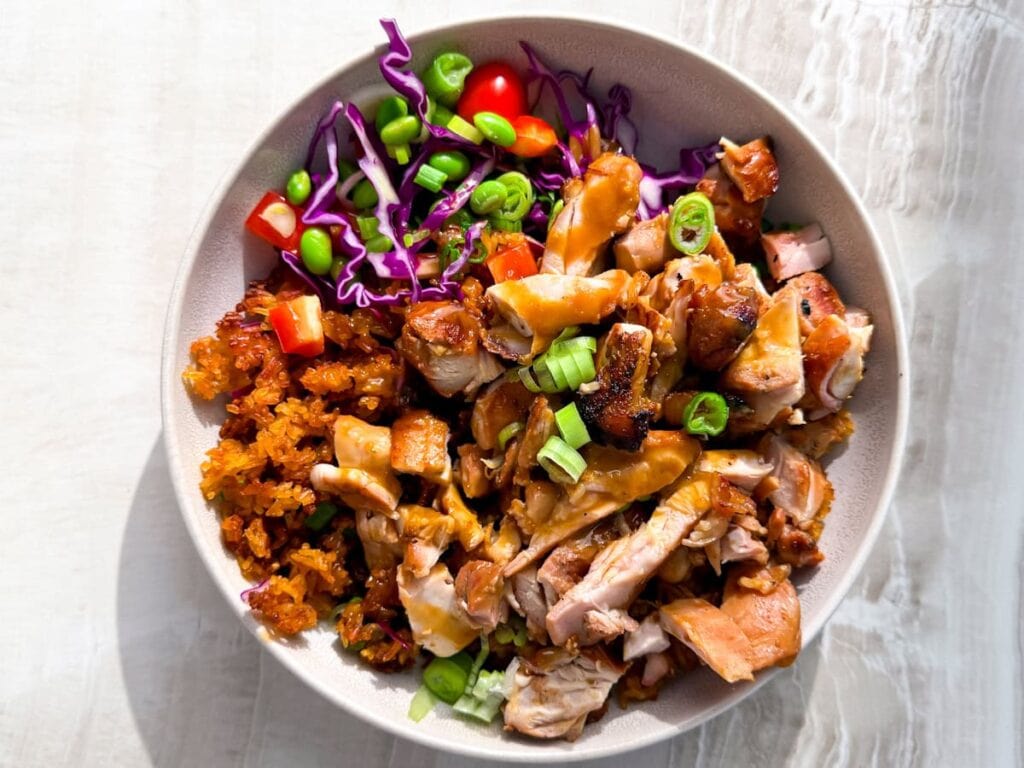
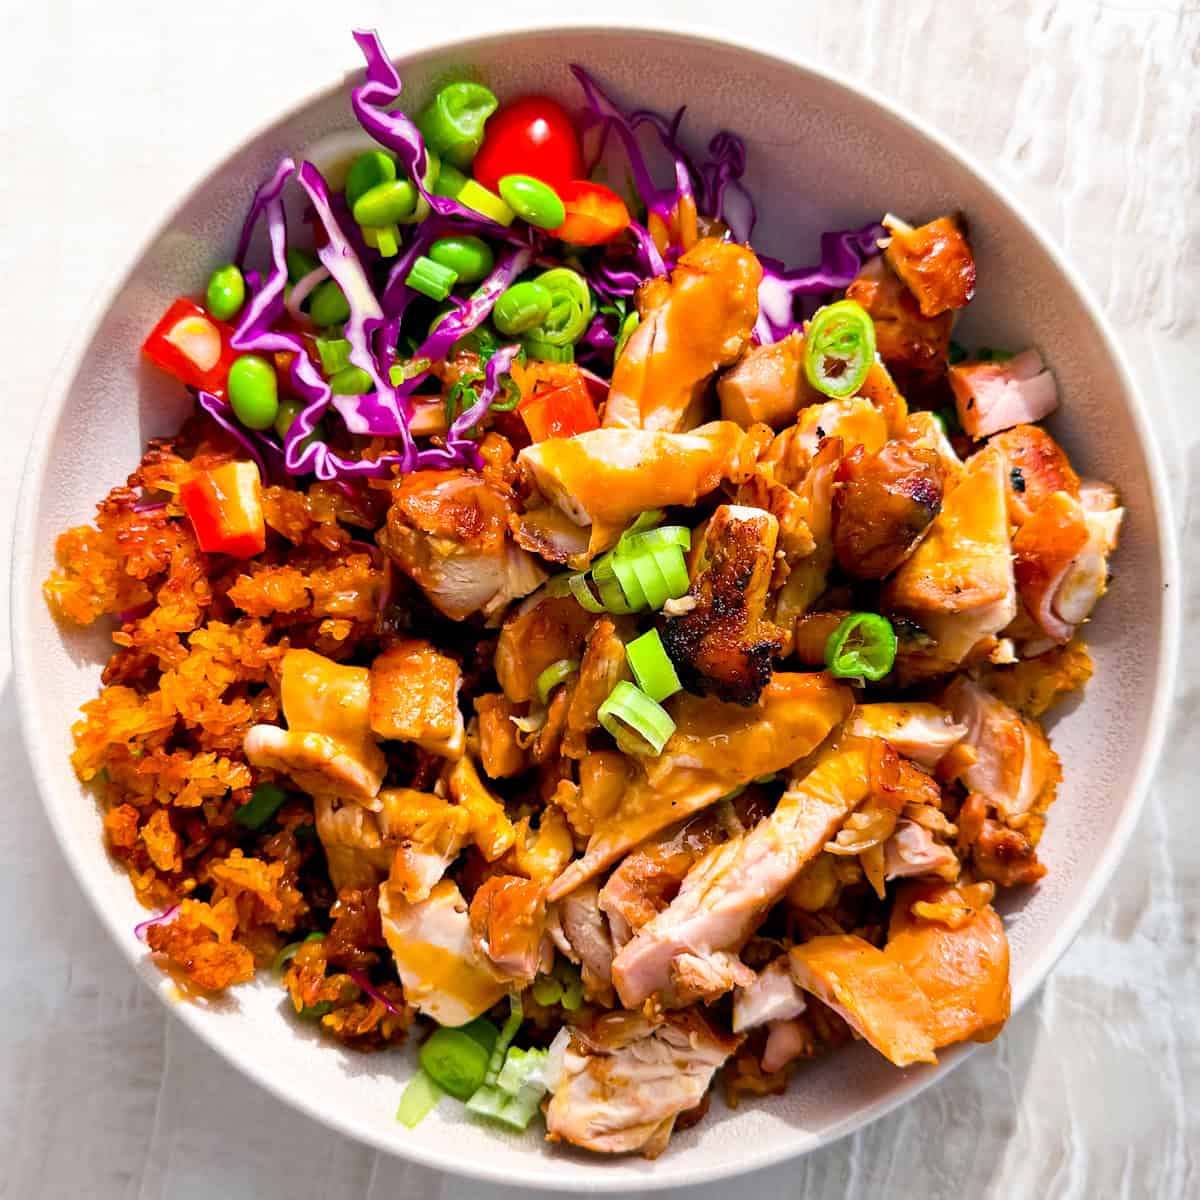
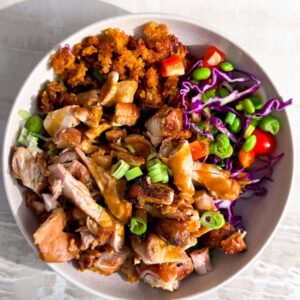
If you're anything like me, always on the hunt for that perfect balance between flavor-packed meals and healthy eating, then you're in for a treat. These Asian Chicken Bowls With Crispy Rice are a game-changer. Think juicy grilled chicken thighs marinated in a zesty tamari blend, on a bed of golden, oven-baked crispy rice, with a vibrant Asian salad and generously tossed in Thai peanut sauce. It's kind of a meal addiction right now! ✨ And if you loved this, try another one of my Asian soup recipes with chicken, my easy crispy tofu bowls, chicken katsu sandwich, or my easy teriyaki chicken poke bowls!
Love Crispy Rice Bowls?
Try this Sweetgreen Crispy Rice Bowl Copycat Recipe!
This post may contain affiliate links, please see our privacy policy for details.
How To Make Asian Chicken Bowls With Crispy Rice
Ingredients for the Chicken Marinade:
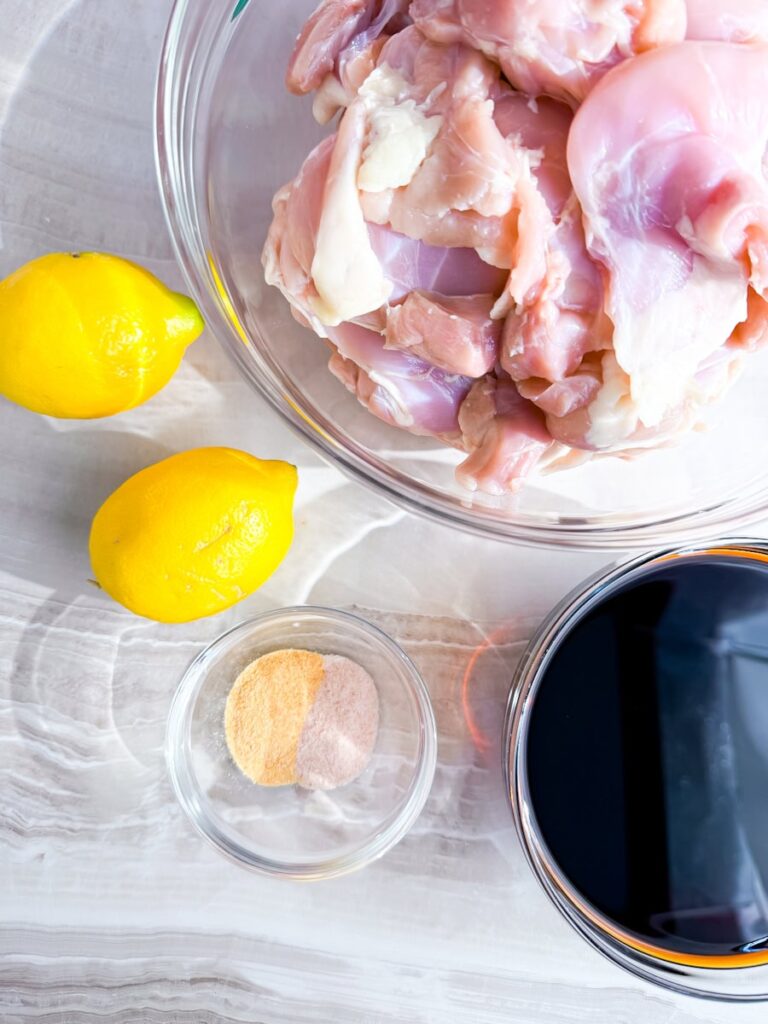
- 10 Chicken Thighs
- 1 Cup Tamari (gluten-free soy sauce)
- Juice of 2 Lemons
- 1 Teaspoon Salt
- 1 Tablespoon Garlic Powder
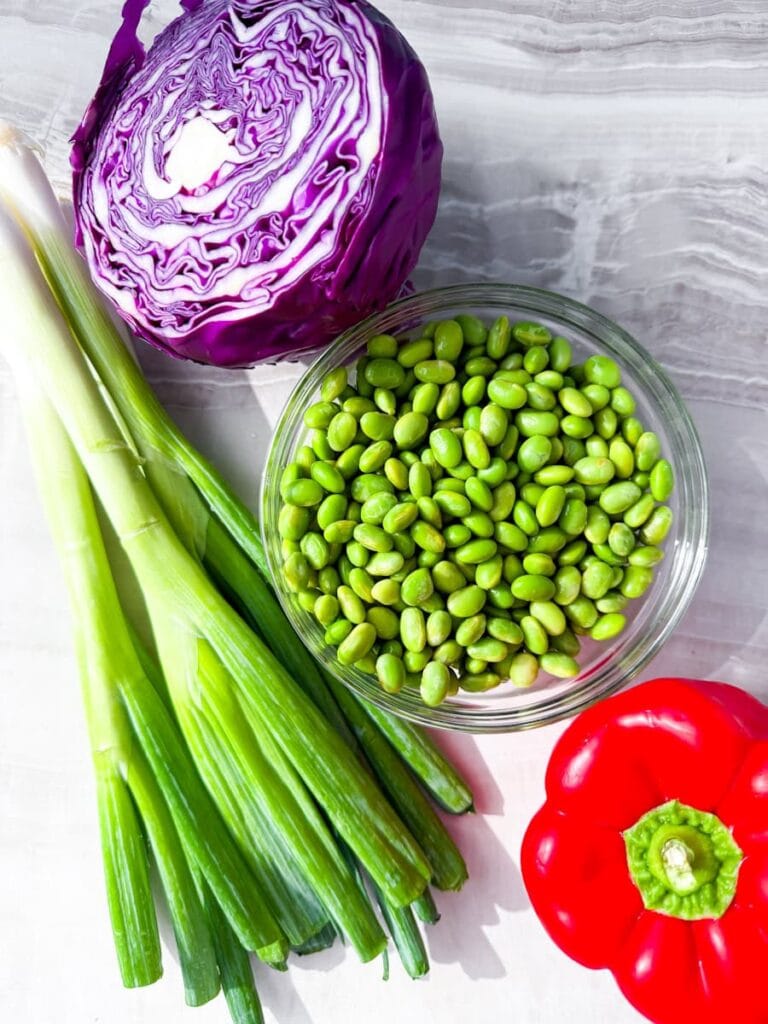
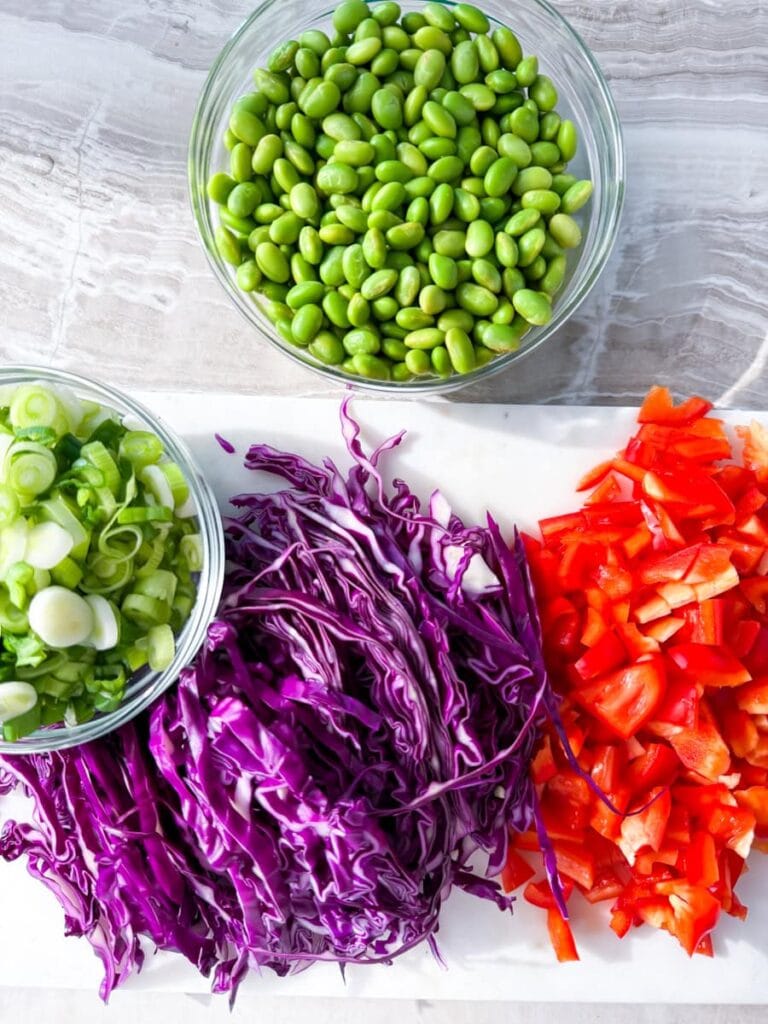
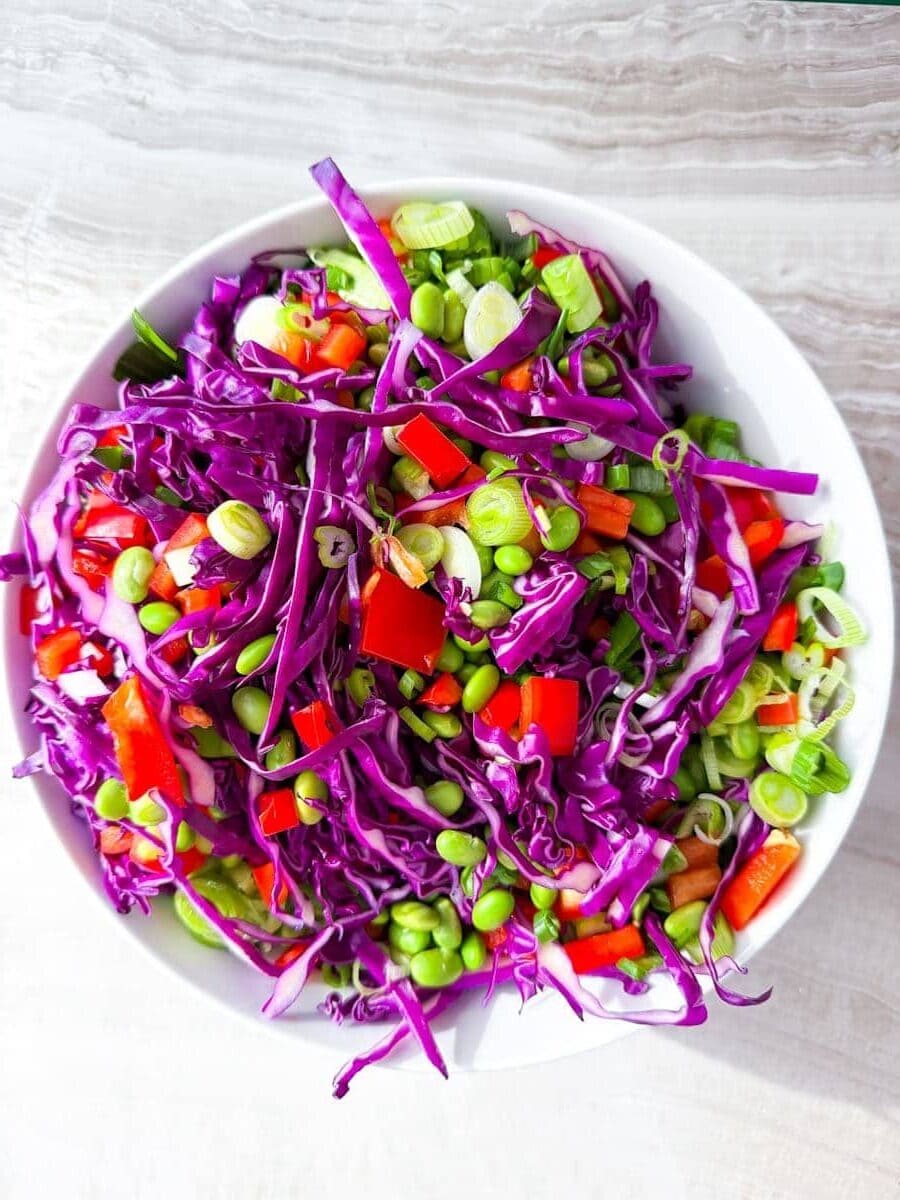
For the Asian Salad:
- 1 Bag Edamame (shelled)
- 1 Bell Pepper, sliced
- 1 Small Red Cabbage, shredded
- 5 Green Onions, chopped
For the Crispy Rice:
- 3 Cups Cooked Rice (preferably day-old)
- 1 Tablespoon Tamari
- 1 Tablespoon Sriracha
- 1 Tablespoon Olive Oil or Sesame Oil
For the Homemade Thai Peanut Sauce:
- ¾ Cup Unsweetened Peanut Butter
- ¼ Cup Maple Syrup or Honey
- 2 Tablespoons Tamari
- 2 Tablespoons Rice Vinegar
- 1 Tablespoon Sesame Oil
- 1 Tablespoon Minced Garlic
- 1 Tablespoon Fresh Grated Ginger
- Juice of 1 Lime
- 1 Teaspoon Salt
Optional Toppings:
- Chopped Peanuts
- Chopped Green Onions
- You could even try my Spicy Cashew Dressing!
Step-By-Step Instructions
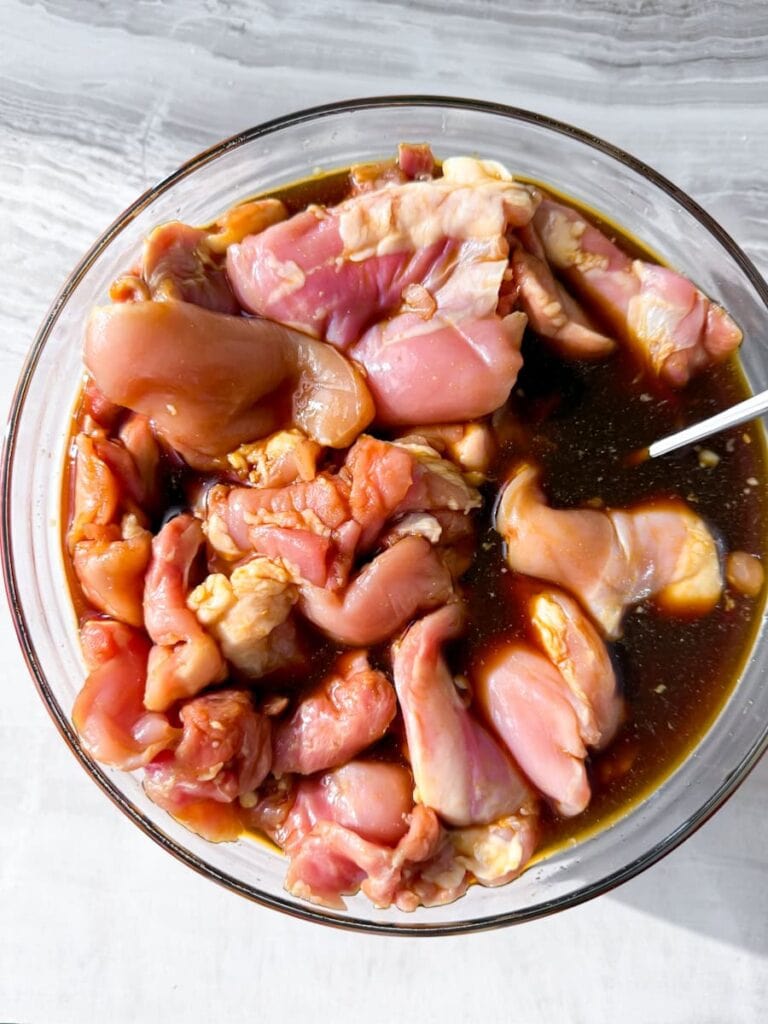
To get started, you'll want to marinate the chicken first so it has time to soak up all that flavor. In a large bowl, whisk together the tamari, freshly squeezed lemon juice, salt, and garlic powder. Add the chicken thighs and toss them until they're fully coated. Cover the bowl and let the chicken marinate in the fridge for at least 20 minutes. This step is key for juicy, flavorful chicken that's anything but boring.
Make the Crispy Rice
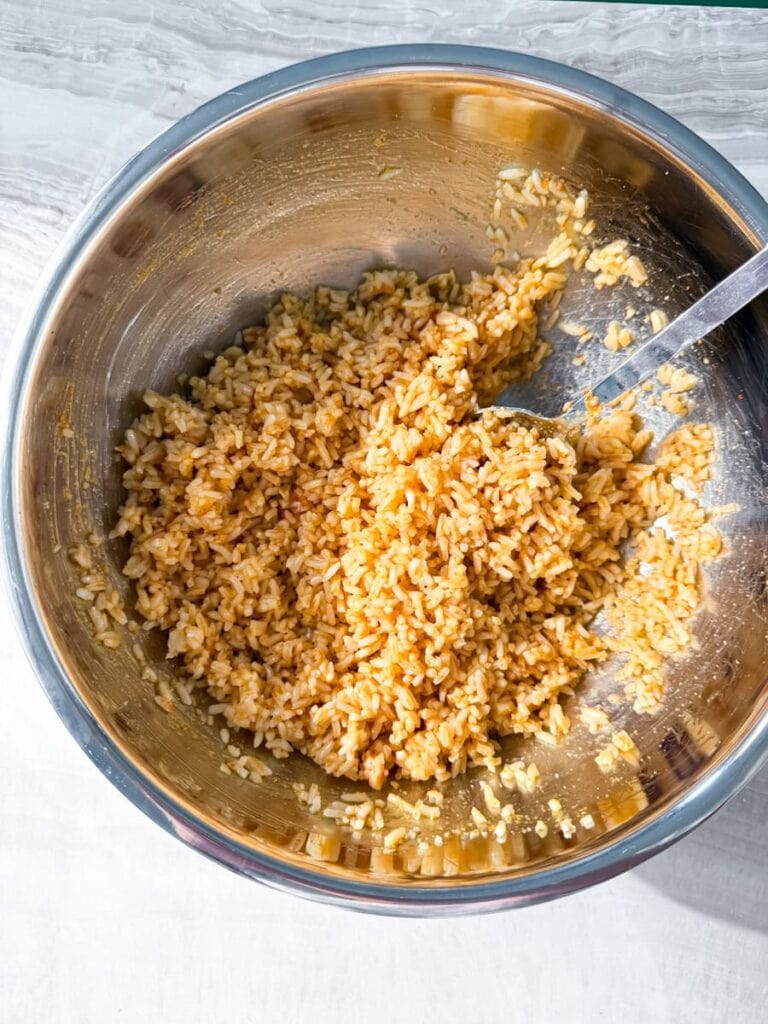
While the chicken is marinating, prep your crispy rice. This part is honestly magical-crispy rice is such a texture win. Preheat your oven to 400°F (or 200°C), then mix your cooked rice (day-old works best!) with tamari, sriracha, and your oil of choice-olive oil or sesame oil both work great here. Spread the rice out in an even layer on a parchment-lined baking sheet. Make sure it's not crowded; you want every grain to get a little crispy action. Bake for about 20-25 minutes, giving it a stir halfway through to make sure it crisps up evenly and turns that perfect golden brown.

Grill or Broil the Chicken
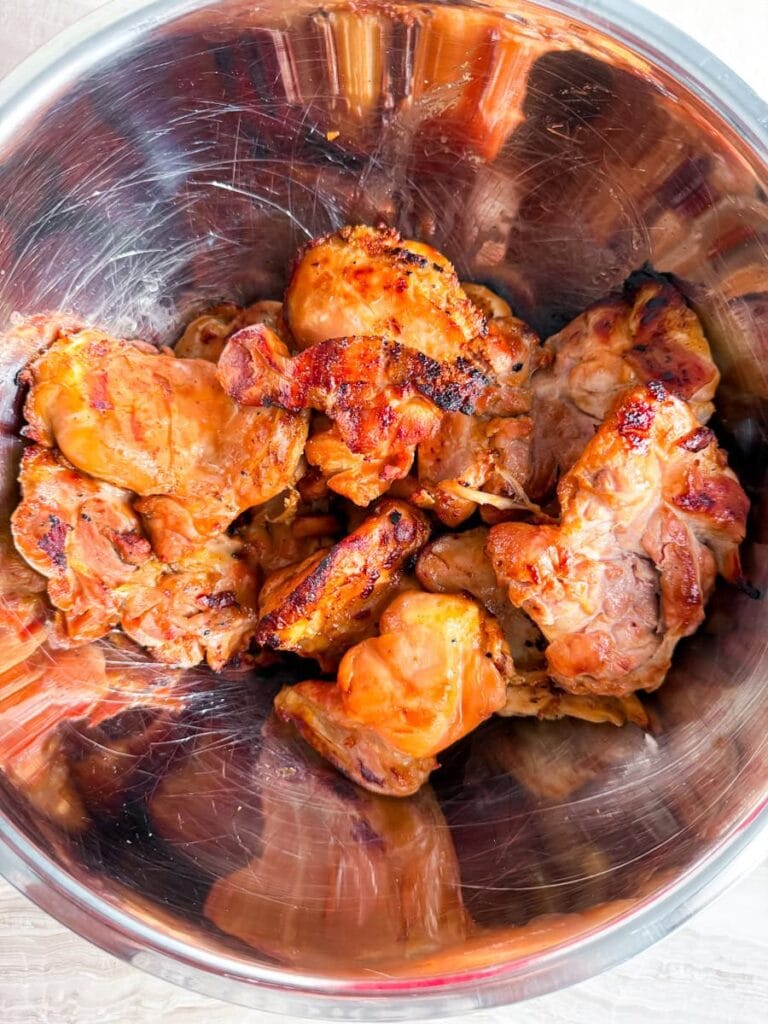
Once the rice is in the oven, it's time to cook the chicken. You can either grill it or broil it-both work well and give you that charred edge that's so good. If grilling, preheat your grill to medium-high heat and cook the chicken thighs for about 6-7 minutes on each side, or until fully cooked and slightly caramelized. If you're using the broiler, place the chicken on a foil-lined baking sheet and broil it on high, until cooked through and slightly crispy on the edges. Let the chicken rest for a few minutes after cooking, then slice it into strips or bite-sized pieces. You could also try my grilled boneless chicken thighs as the protein in this recipe!
Next up, assemble the Asian salad. This adds a fresh, crunchy contrast to the rest of the bowl. In a large bowl, toss together shelled edamame, thinly sliced bell pepper, shredded red cabbage, and chopped green onions. You can prep this while the rice finishes baking or even ahead of time if you're meal-prepping.

Thai Peanut Sauce
Now, let's talk sauce-the Thai peanut sauce is what ties this whole dish together. First of all, there's no shame in buying the sauce (I do this most of the time….shhh)! Be sure to buy a brand that is gluten free and refined sugar free-lot's of Thai peanut sauces are loaded with sugar.
But nothing beats homemade-let's make it! In a blender or food processor, combine the unsweetened peanut butter, maple syrup (or honey), tamari, rice vinegar, sesame oil, garlic, ginger, lime juice, and salt. Blend it all until smooth and creamy. If the sauce feels too thick, just add a splash of warm water to loosen it up to your desired consistency. It should be pourable but not watery.
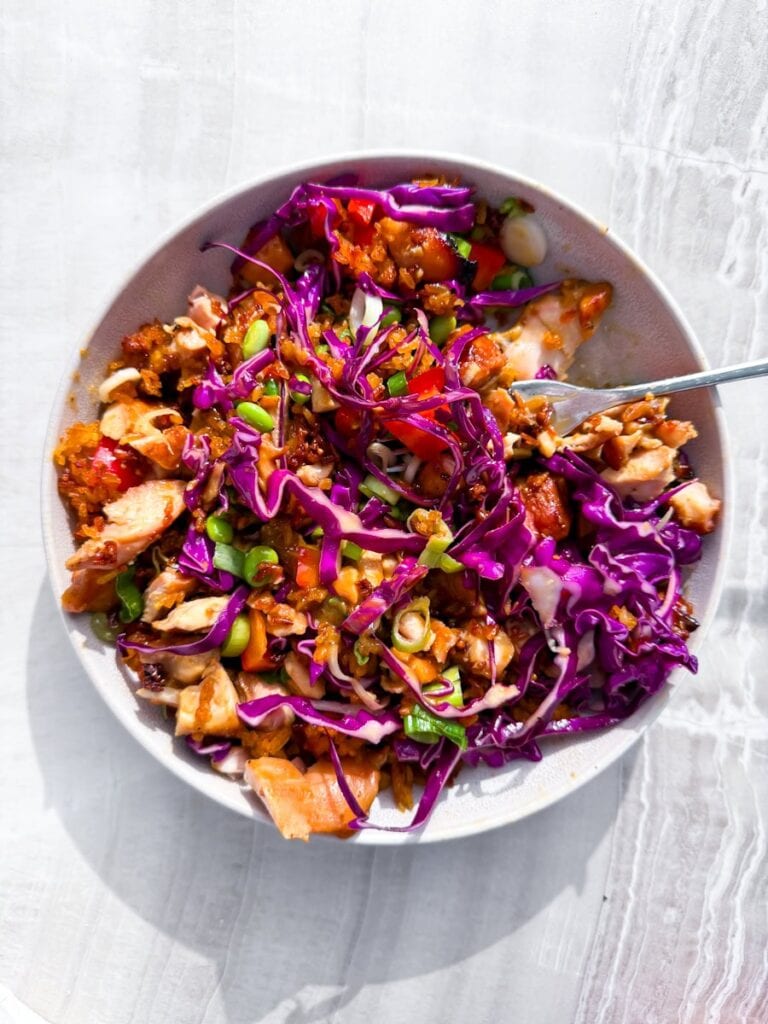
Now comes the fun part: assembling your bowls. Start with a layer of that crispy rice at the bottom, then pile on the sliced grilled chicken and a generous scoop of your crunchy Asian salad. Drizzle everything with the peanut sauce (don't be shy-it's so good), and finish with chopped peanuts and green onions for that extra crunch and freshness.
Why You'll Love This Recipe
- Gluten-Free Goodness: Utilizing tamari instead of traditional soy sauce ensures this dish is celiac-friendly without compromising on flavor.
- Meal Prep Friendly: Components can be prepared ahead, making your weekday lunches a breeze.
- Flavor & More Flavor: From the savory marinade to the spicy-sweet peanut sauce, every bite is full of deliciousness.
- Texture Galore: The contrast between the crispy rice, tender chicken, and crunchy veggies is simply irresistible.
Check out the recipe video on Instagram!
Ingredient Substitutions (and Why This Recipe Is Gluten-Free)
One of the best parts about this Asian Chicken Bowls With Crispy Rice recipe is how customizable it is. Whether you're working with dietary restrictions, pantry limitations, or just want to mix it up, there are plenty of easy swaps you can make without sacrificing flavor or texture. Let's break it down:
Tamari vs. Soy Sauce
The recipe calls for tamari, which is a gluten-free alternative to soy sauce that has a deep, rich umami flavor. If you're not gluten-free, you can absolutely sub in regular soy sauce. Just make sure to use low-sodium if you're watching salt intake-both tamari and soy sauce can be pretty salty.
Gluten-Free Tip:
Traditional soy sauce contains wheat, so it's not gluten-free by default. Always check labels, or stick with tamari or coconut aminos for a safe swap.
Coconut Aminos (Soy-Free Alternative)
If you're avoiding both gluten and soy, coconut aminos are a great option. They're slightly sweeter and less salty than tamari but still give you that savory, umami depth. They're perfect for anyone managing soy allergies or eating Paleo.
Peanut Butter Substitutes
This Thai peanut sauce is the heart of the bowl-but if you're nut-free or just don't love peanuts, you can totally switch it up. Try:
- Almond butter - a more subtle flavor but still creamy and rich.
- Sunflower seed butter - great for nut-free homes and school-friendly lunches.
- Cashew butter - adds a slightly sweet, buttery flavor that works beautifully in sauces.
Maple Syrup vs. Honey
Both work as sweeteners in the peanut sauce. If you're strictly plant-based, stick with maple syrup. If not, honey adds a lovely floral sweetness and pairs really well with the ginger and lime.
Save This Recipe!
Chicken Thighs vs. Chicken Breasts
I love using chicken thighs here because they're juicy, flavorful, and don't dry out under high heat. But if you prefer leaner meat, chicken breasts can work just as well. Just be sure to adjust your broil time to avoid overcooking them-they cook faster!
Vegetarian Protein Options
Want to make it meat-free? Totally doable. Swap the chicken for:
- Extra-firm tofu, pressed and grilled or broiled
- Tempeh, sliced thin and marinated
- Chickpeas, roasted or sautéed for added texture
These options work beautifully with the same marinade and peanut sauce and are packed with plant-based protein.
Veggie Swaps for the Salad
Don't have edamame or red cabbage? No problem. The salad part is super flexible. You can sub or add:
- Shredded carrots
- Snap peas or snow peas
- Cucumber ribbons
- Thinly sliced radish
- Napa cabbage or green cabbage
- Baby spinach or kale for a leafy green version
Just aim for a variety of color and texture for that perfect crunch and freshness.
Rice Options
Day-old white rice is ideal for that crispy finish, but here are a few other options:
- Brown rice - a little nuttier and chewier, but still crisps up well
- Jasmine or basmati rice - fragrant and light
- Cauliflower rice - for a low-carb option, but note it won't get quite as crispy
- Quinoa - can crisp in the oven too if you coat it in a bit of oil and bake it longer
Pro Tip: If you're using fresh rice instead of day-old, just spread it out on a plate or tray and pop it in the fridge for 20-30 minutes to dry it out a bit before baking. This helps it crisp instead of steam.
Frequently Asked Questions
Can I use chicken breasts instead of thighs?
Yes, chicken breasts can absolutely be used in this recipe. Just keep in mind they cook faster and can dry out more easily than thighs, so reduce the broil time and keep a close eye on them to prevent overcooking.
How do I get my rice extra crispy in the oven?
Day-old rice is your best friend here-it's drier and crisps up beautifully. Also, make sure to spread the rice in a thin, even layer and don't overcrowd the pan. Stir it halfway through baking to get all sides golden and crunchy.
What's a good substitute for tamari?
If you're not gluten-free, regular soy sauce works perfectly. For a gluten- and soy-free option, try coconut aminos-they have a similar salty-sweet flavor profile.
Can I make the Thai peanut sauce ahead of time?
Yes! The sauce can be made up to a week in advance. Store it in an airtight container in the fridge and give it a stir (or shake) before using. Add a splash of warm water if it thickens too much.
Can this recipe be made vegetarian or vegan?
Totally. Swap the chicken for marinated tofu or tempeh, and use maple syrup instead of honey in the peanut sauce to make it fully vegan. Everything else is already plant-based and packed with flavor.
Is this recipe good for meal prep?
This recipe is ideal for meal prep. Just store the crispy rice, chicken, salad, and sauce in separate containers, then assemble when ready to eat. The components stay fresh for 3-4 days in the fridge.
How spicy is this recipe?
The sriracha in the rice and the ginger in the peanut sauce give a gentle kick, but it's not overly spicy. You can easily scale the spice up or down depending on your preference.
Can I freeze any of the components?
You can freeze the cooked chicken and rice separately. Just cool them completely, store in freezer-safe containers, and reheat as needed. The salad and peanut sauce are best made fresh or stored in the fridge.
What kind of rice works best?
Short- or medium-grain white rice works great for this recipe-jasmine is a go-to. You want something that will crisp nicely in the oven. Avoid sticky or sushi rice, which can clump.
What vegetables can I swap into the salad?
This is super customizable. Shredded carrots, cucumber ribbons, radishes, snap peas, or even lightly sautéed zucchini would all be great additions or swaps based on what you have on hand.
Enjoy!
This Asian Chicken Bowl With Crispy Rice is more than just a meal; it's a delightful fusion of flavors and textures that brings comfort and excitement to your table. Whether you're meal prepping for the week or looking for a perfect dinner option, this recipe has got you covered. Enjoy the crunch, & savor the flavors! If you love this recipe, try making my Cooked Salmon Poke Bowls for another Asian style dish!
Have the sweetest day & tag me on Instagram when you make this recipe! @entirelyemmy ✨
📖 Recipe
Asian Chicken Bowls With Crispy Rice
Ingredients
- 10 Chicken Thighs
Chicken Thigh Marinade
- 1 Cup Tamari or gluten free soy sauce
- 2 Lemons juiced
- 1 Teaspoon Salt
- 1 Tablespoon Garlic Powder
Asian Salad
- 1 Bag Edamame
- 1 Bell Pepper
- 1 Small Red Cabbage
- 5 Green Onions chopped
Crispy Rice
- 3 Cups Cooked Rice
- 1 Tablespoon Tamari or gluten free soy sauce
- 1 Tablespoon Sriracha
- 1 Tablespoon Olive Oil or sesame oil
Toppings
- Thai Peanut Sauce recipe below
- Chopped Peanuts
- Chopped Green Onions
Homemade Thai Peanut Sauce
- ¾ Cup Peanut Butter unsweetened
- ¼ Cup Maple Syrup or honey
- 2 Tablespoons Tamari or gluten free soy sauce
- 2 Tablespoons Rice Vinegar
- 1 Tablespoon Sesame Oil
- 1 Tablespoon Garlic minced
- 1 Tablespoon Fresh Ginger grated or minced
- 1 Lime juiced
- 1 Teaspoon Salt
Instructions
- Whisk together tamari, lemon juice, salt, and garlic powder in a bowl. Add the chicken thighs and toss to coat. Cover and marinate in the fridge for at least 20 minutes.
- Preheat the oven to 400°F. In a separate bowl, mix cooked rice with tamari, sriracha, and oil. Spread the rice evenly on a parchment-lined baking sheet and bake for 20 to 25 minutes, stirring halfway through, until crispy and golden brown.
- Preheat the oven to broil. Place the marinated chicken thighs on a foil-lined baking sheet and broil for about 15 minutes until cooked through and slightly charred or until the chicken reaches an internal temp of 165℉. Let rest, then slice into strips or bite-sized pieces.
- In a bowl, combine edamame, sliced bell pepper, shredded red cabbage, and chopped green onions to make the salad.
- Add all peanut sauce ingredients to a blender or food processor and blend until smooth. If it's too thick, add a splash of warm water to loosen.
- To assemble, layer crispy rice in a bowl, top with sliced chicken and salad, drizzle with peanut sauce, and finish with chopped peanuts and green onions.


Emily says
The crispy rice is game changer! Such an easy recipe too!